前面介绍了基本的转场动画的操作,这里专门介绍一下视图控制器的转场。
平常使用app的时候,总是会有屏幕左边缘右滑返回,TabBar点击切换,Present模态弹出视图,这大概是我们在控制器间切换的三种方式,那么,如何在这三种场景下,切换控制器的时候,用我们自己的转场动画呢(也就是不用系统默认的)。
在iOS7之前,我们只能使用系统提供的转场效果,大部分时候够用,但仅仅是够用而已,总归会有各种不如意的小地方,但我们却无力改变;iOS 7 开放了相关 API 允许我们对转场效果进行全面定制,这太棒了,自定义转场动画以及对交互手段的支持带来了无限可能。
先来了解两个概念
- 非交互式转场
- 交互式转场
非交互式转场:意思就是自动转场,转场的时候不可控制,比如我们push的时候,一下子就过去了,我们没法控制它。
交互式转场:可以操控的一种转场,最常见的是左滑pop的时候,我们可以滑一半,滑一点,这时候pop的行为我们可以通过交互的方式不停操控。
1.自定义转场必要条件
不管是非交互式转场,或者是交互式转场,我们都要实现转场。那么如何实现自定义转场呢?
1.转场代理
自定义转场的第一步就是提供转场代理,告诉系统使用我们提供的代理,而不是系统默认代理来执行转场。
- 导航栏push/pop:UINavigationControllerDelegate
- tabBar点击切换:UITabBarControllerDelegate
- present模态切换:UIViewControllerTransitioningDelegate
2.动画控制器
遵守对应的转场代理后,实现代理方法中返回
UIViewControllerAnimatedTransitioning的方法,可以理解为返回一个动画控制器。也就是说,转场发生时,UIKit将要求转场代理提供转场的核心构件:动画控制器和交互控制器(自定义动画的话,动画控制器肯定要实现的,但是交互控制器看自己需求了,毕竟非交互式转场还是交互式转场看自己需求。当然了,这两个控制器的代理方法都是可选方法,毕竟不实现的话或者返回nil,默认用系统的呗~)总结:这是我们自定义转场动画中,最重要的一个部分。
交互控制器
通过交互手段,通常是手势来驱动动画控制器实现的动画,使得用户能够控制整个过程。实现代理方法中返回的
UIViewControllerInteractiveTransitioning的方法。和上面动画控制器不同的是,动画控制器可以自己定义个类,去遵循UIViewControllerAnimatedTransitioning协议并实现代理方法,而UIViewControllerInteractiveTransitioning协议却不用我们去遵循并实现(其实也不好实现),系统已经打包好现成的类供我们使用,简单来说,创建遵循UIViewControllerInteractiveTransitioning协议的类型的最简单方式是继承UIPercentDrivenInteractiveTransition类。这是一个遵循UIViewControllerInteractiveTransitioning协议的类,为我们预先实现和提供了一系列便利的方法,可以用一个百分比来控制交互式切换的过程。转场环境
在实现动画控制器的代理中,其中有个遵守
UIViewControllerContextTransitioning协议的方法,该方法需要提供转场中需要的数据。
总结下,实现一个最低限度可用的转场动画,我们至少需要提供转场代理和动画控制器,同时还有一个转场环境是必须的,不过这由系统提供;当进一步实现交互转场时,还需要我们提供交互控制器,这个系统已经提供了现成的类给我使用。
2.实战
2.1 导航栏push/pop
先看一下效果图,如下
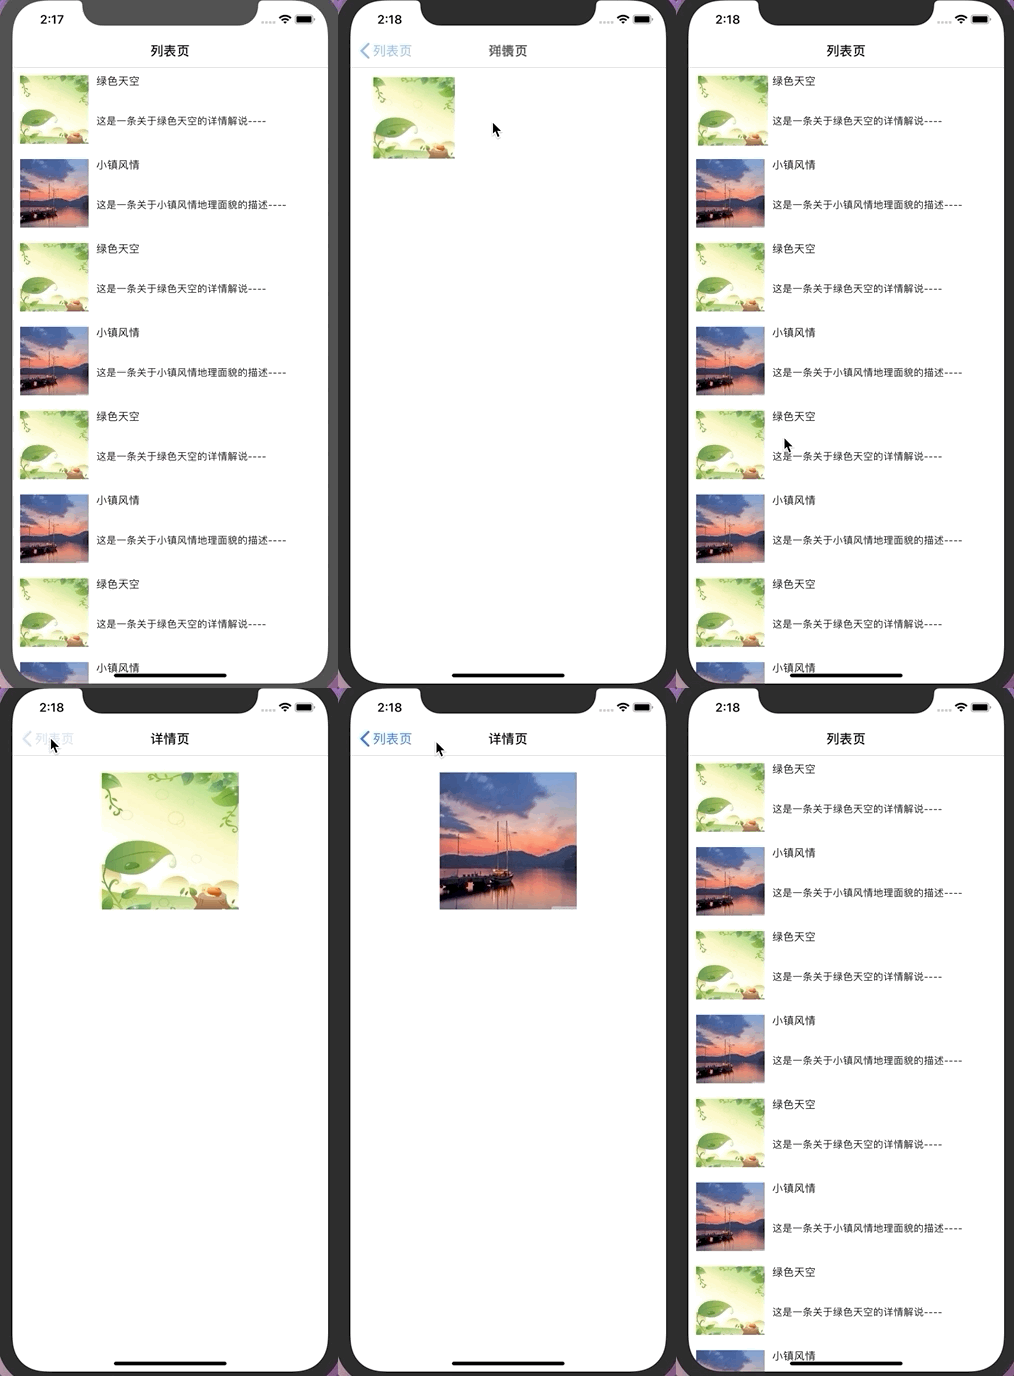
思路:
1.在列表页的控制器里遵循转场代理,并实现返回动画控制器
UIViewControllerAnimatedTransitioning的协议方法,从而告诉了系统我们不用你的默认转场,我们自己实现去(当然了如果动画控制器返回nil默认还是系统的动画)1
2
3
4
5
6
7
8
9
10
11
12
13override func viewDidAppear(_ animated: Bool) {
self.navigationController?.delegate = self
}
extension ViewController: UINavigationControllerDelegate {
func navigationController(_ navigationController: UINavigationController, animationControllerFor operation: UINavigationController.Operation, from fromVC: UIViewController, to toVC: UIViewController) -> UIViewControllerAnimatedTransitioning? {
if operation == .push {
return MagicPushTransition()
} else {
return nil
}
}
}2.定义
MagicPushTransition类,并继承动画控制器协议UIViewControllerAnimatedTransitioning,实现协议方法1
2
3
4
5
6
7
8
9class MagicPushTransition: NSObject, UIViewControllerAnimatedTransitioning {
func transitionDuration(using transitionContext: UIViewControllerContextTransitioning?) -> TimeInterval {
return 0.5
}
func animateTransition(using transitionContext: UIViewControllerContextTransitioning) {
//转场环境
}3.在
MagicPopTransition里实现push动画控制器里的转场环境,这里根据我们想做的动画来操作fromVC和toVC以及对应vc里的控件。1
2
3
4
5
6
7
8
9
10
11
12
13
14
15
16
17
18
19
20
21func animateTransition(using transitionContext: UIViewControllerContextTransitioning) {
let fromVC = transitionContext.viewController(forKey: .from) as! ViewController
let toVC = transitionContext.viewController(forKey: .to) as! DetailViewController
let container = transitionContext.containerView
let snapView = fromVC.selectCell?.photoView?.snapshotView(afterScreenUpdates: true)
snapView?.frame = container.convert((fromVC.selectCell?.photoView!.frame)!, from: fromVC.selectCell)
toVC.photoView?.isHidden = true
container.addSubview(toVC.view)
container.addSubview(snapView!)
UIView.animate(withDuration: 0.5, animations: {
snapView?.frame = toVC.photoView!.frame
}) { (result) in
snapView?.removeFromSuperview()
toVC.photoView?.isHidden = false
transitionContext.completeTransition(!transitionContext.transitionWasCancelled)
}
}说明:转场环境里,
transitionContext.containerView的视图创建,其实可以看做在转场的时候,专门独立出一个视图view,然后把fromVC里的view和toVC里的view之间的转变添加到这个containerView上,而转场环境,最后操作展示的也只是这个containerView上的东西,注意添加到containerView上视图的顺序不能错。另外需要注意的是,在动画完成的时候,要将转场动画的权限还给系统,否则会出问题,在这里我们根据是否取消的属性来返回即可。4.同样的,定义类
MagicPopTransition,继承动画控制器协议,并实现对应协议方法,完善转场环境。当然了,同样需要在pop的那个控制器里遵循转场代理,并返回转场控制器,和上面push一样的。1
2
3
4
5
6
7
8
9
10
11
12
13
14
15
16
17
18
19
20
21
22
23
24
25
26
27
28
29
30class MagicPopTransition: NSObject, UIViewControllerAnimatedTransitioning {
func transitionDuration(using transitionContext: UIViewControllerContextTransitioning?) -> TimeInterval {
return 0.5
}
func animateTransition(using transitionContext: UIViewControllerContextTransitioning) {
let fromVC = transitionContext.viewController(forKey: .from) as! DetailViewController
let toVC = transitionContext.viewController(forKey: .to) as! ViewController
let container = transitionContext.containerView
let snapView = fromVC.photoView?.snapshotView(afterScreenUpdates: false)
snapView?.frame = (fromVC.photoView?.frame)!
toVC.selectCell?.photoView?.isHidden = true
container.addSubview(toVC.view)
container.addSubview(snapView!)
UIView.animate(withDuration: 0.5, animations: {
snapView?.frame = container.convert((toVC.selectCell?.photoView?.frame)!, from: toVC.selectCell)
}) { (result) in
snapView?.removeFromSuperview()
toVC.selectCell?.photoView?.isHidden = false
transitionContext.completeTransition(!transitionContext.transitionWasCancelled)
}
}
}
上面完整的一个自定义动画就这样完成了,那么会有人说了,平时我们pop的时候,习惯于侧滑返回,好像是这么回事。这时候就涉及到了交互,即交互式转场。那也很简单,按照上面自定义转场必要条件里提的,我们需要实现一个交互控制器。
在需要pop的控制器里,实现转场代理里返回
UIViewControllerInteractiveTransitioning协议的方法1
2
3
4
5
6
7//交互式转场
func navigationController(_ navigationController: UINavigationController, interactionControllerFor animationController: UIViewControllerAnimatedTransitioning) -> UIViewControllerInteractiveTransitioning? {
if animationController is MagicPopTransition {//判断是否是我们需要的那个动画控制器
return percentTranstion
}
return nil
}定义遵循
UIViewControllerInteractiveTransitioning交互控制器协议的类,好说,系统已经给我们提供好了,即UIPercentDrivenInteractiveTransition类。1
var percentTranstion: UIPercentDrivenInteractiveTransition?
在控制器里定义边缘滑动手势,定义滑动方向。根据滑动的距离百分比,交互式的刷新动画(也就是转场代理下的动画控制器,里面的转换系统的交互类已经帮我们实现了,不用我们操心),完成或者取消操作。
1
2
3
4
5
6
7
8
9
10
11
12
13
14
15
16
17
18
19
20
21
22
23
24
25
26
27
28
29let edgePageGesture = UIScreenEdgePanGestureRecognizer(target: self, action: #selector(edgeAction(sender:)))
edgePageGesture.edges = .left
self.view.addGestureRecognizer(edgePageGesture)
func edgeAction(sender: UIScreenEdgePanGestureRecognizer) {
//计算手指滑动的距离
//计算手势驱动占屏幕的百分比
let distance = sender.translation(in: sender.view).x / self.view.bounds.size.width
if sender.state == .began {
print("开始滑动")
self.percentTranstion = UIPercentDrivenInteractiveTransition()
self.navigationController?.popViewController(animated: true)
} else if sender.state == .changed {
self.percentTranstion?.update(distance)
print("状态改变中")
} else if sender.state == .ended || sender.state == .cancelled {
if distance > 0.5 {
self.percentTranstion?.finish()
print("结束了")
} else {
self.percentTranstion?.cancel()
print("取消了")
}
self.percentTranstion = nil
}
}
看一下效果吧,如下:
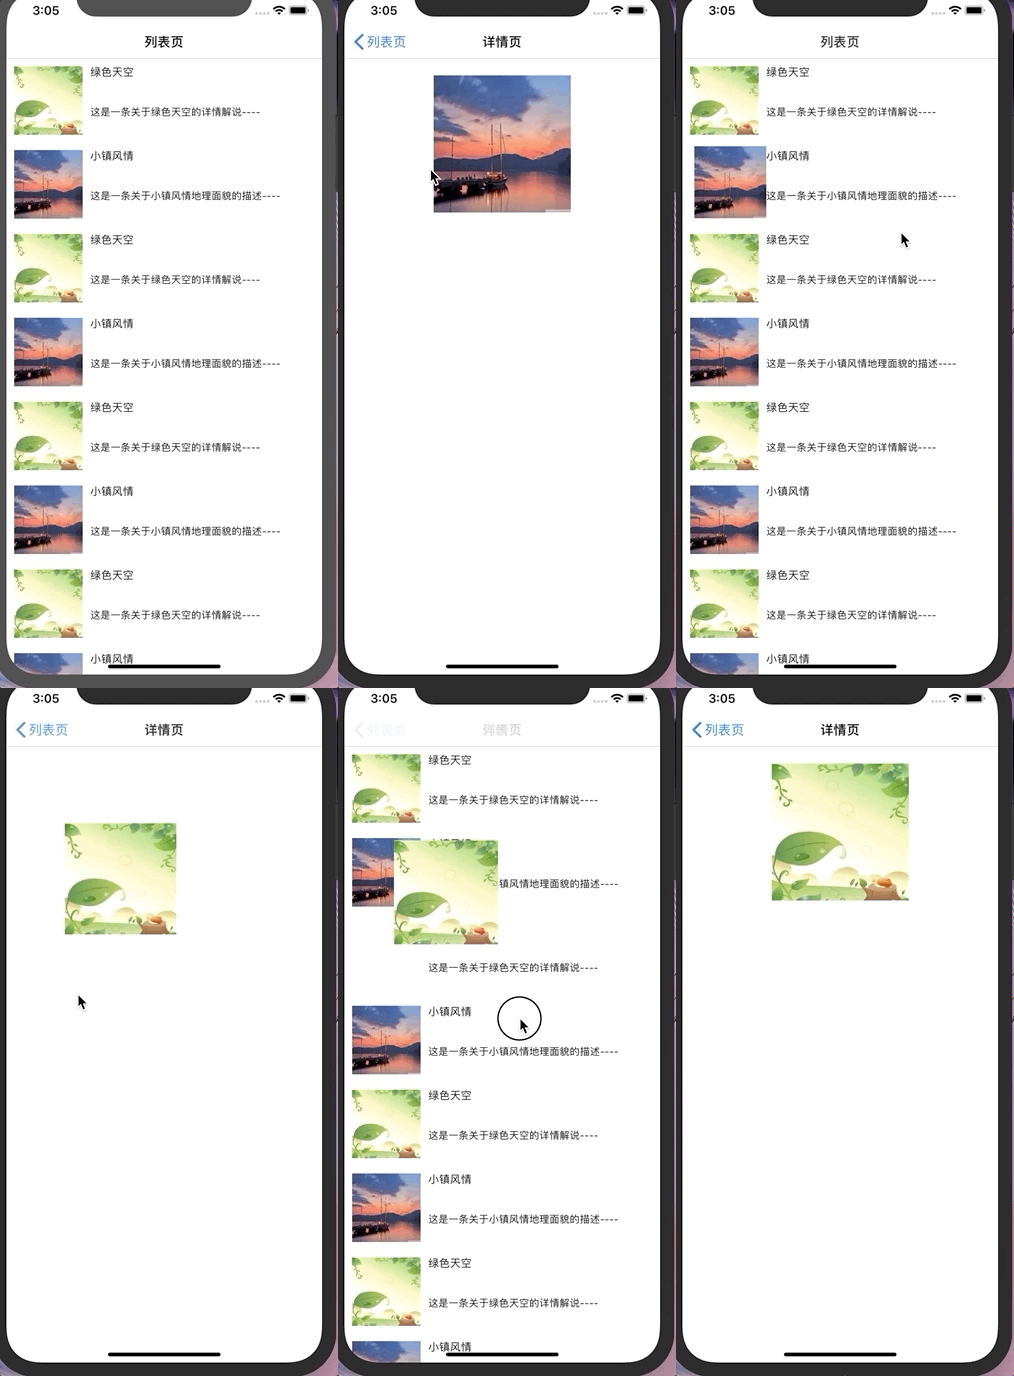
怎么样,是不是一个完整的交互式动画也实现了~
2.2 tabBar点击切换
先看下效果图吧,如下:
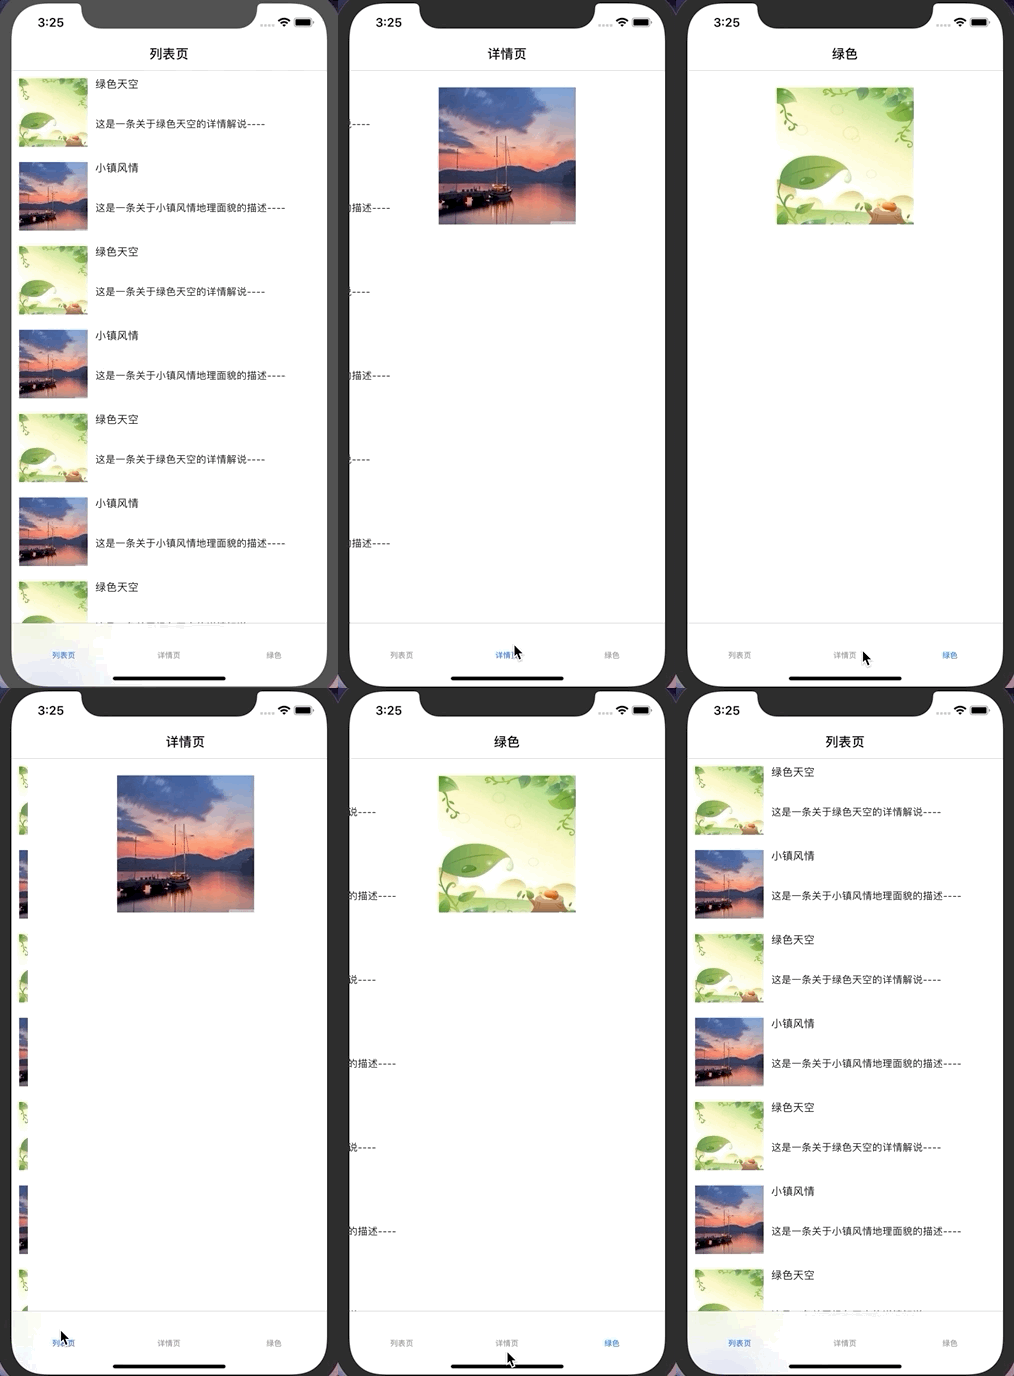
思路也是一样的
遵循对应的转场代理,并实现返回动画控制器
UIViewControllerAnimatedTransitioning的协议方法。1
2
3
4
5
6
7
8
9
10
11
12self.delegate = self //当前控制器是继承UITabBarController
extension MainViewController: UITabBarControllerDelegate {
func tabBarController(_ tabBarController: UITabBarController, animationControllerForTransitionFrom fromVC: UIViewController, to toVC: UIViewController) -> UIViewControllerAnimatedTransitioning? {
let tabbarControllers = tabBarController.viewControllers
if tabbarControllers?.firstIndex(of: toVC) ?? 0 > tabbarControllers?.firstIndex(of: fromVC) ?? 0{
return MagicTabbarTransition().directionWithEdgeSide(edge: .left)
} else {
return MagicTabbarTransition().directionWithEdgeSide(edge: .right)
}
}
}定义类
MagicTabbarTransition,并遵守协议UIViewControllerAnimatedTransitioning,实现协议方法1
2
3
4
5
6
7
8
9
10
11
12
13
14
15
16
17
18
19
20
21
22
23
24
25
26
27
28
29
30
31
32
33class MagicTabbarTransition: NSObject, UIViewControllerAnimatedTransitioning {
var direction: UIRectEdge?
func transitionDuration(using transitionContext: UIViewControllerContextTransitioning?) -> TimeInterval {
return 0.5
}
func animateTransition(using transitionContext: UIViewControllerContextTransitioning) {
let fromView = transitionContext.view(forKey: .from)
let toView = transitionContext.view(forKey: .to)
let contentView = transitionContext.containerView
contentView.addSubview(toView!)
contentView.addSubview(fromView!)
UIView.animate(withDuration: self.transitionDuration(using: transitionContext), animations: {
if self.direction == UIRectEdge.right {
fromView?.frame = CGRect(x: UIScreen.main.bounds.size.width, y: 0, width: contentView.frame.size.width, height: contentView.frame.size.height)
toView?.frame = CGRect(x: 0, y: 0, width: contentView.frame.size.width, height: contentView.frame.size.height)
} else {
fromView?.frame = CGRect(x: -UIScreen.main.bounds.size.width, y: 0, width: contentView.frame.size.width, height: contentView.frame.size.height)
toView?.frame = CGRect(x: 0, y: 0, width: contentView.frame.size.width, height: contentView.frame.size.height)
}
}) { (result) in
transitionContext.completeTransition(!transitionContext.transitionWasCancelled)
}
}
//方向
func directionWithEdgeSide(edge: UIRectEdge) -> MagicTabbarTransition {
direction = edge
return self
}
}
2.3 present模态切换
效果图如下:
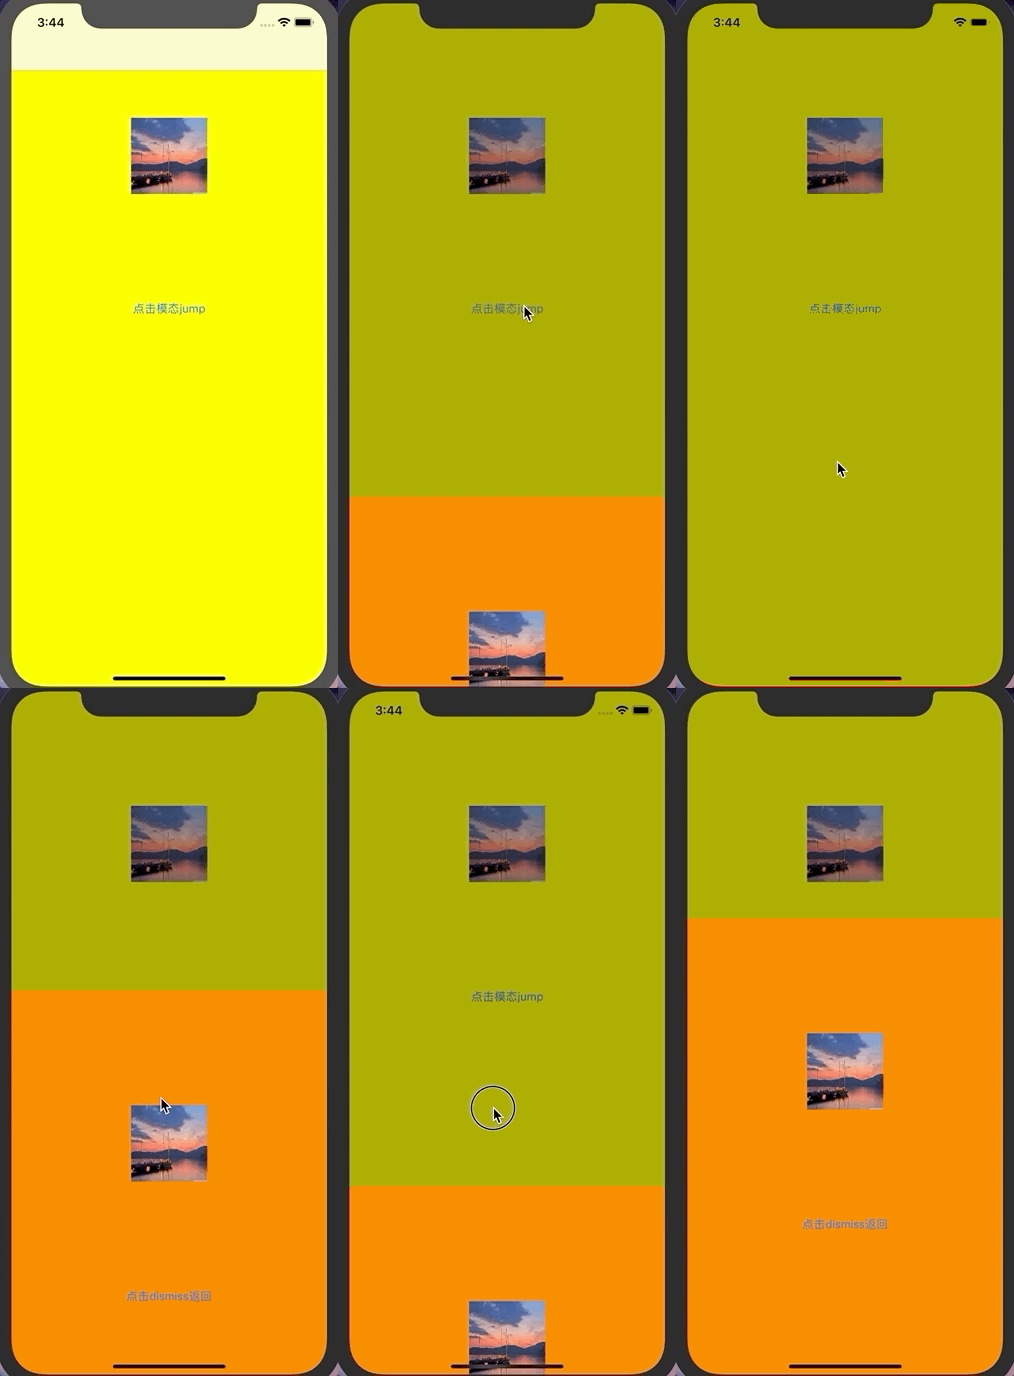
思路如下:
在弹出的视图控制器里遵循转场代理
UIViewControllerTransitioningDelegate,实现对应的协议方法,即动画控制器和交互控制器1
2
3
4
5
6
7
8
9
10
11
12
13
14self.transitioningDelegate = self
extension BViewController: UIViewControllerTransitioningDelegate {
func animationController(forPresented presented: UIViewController, presenting: UIViewController, source: UIViewController) -> UIViewControllerAnimatedTransitioning? {
return MagicPresentTransition().reloadWithPresent(isPresent: true)
}
func animationController(forDismissed dismissed: UIViewController) -> UIViewControllerAnimatedTransitioning? {
return MagicPresentTransition().reloadWithPresent(isPresent: false)
}
func interactionControllerForDismissal(using animator: UIViewControllerAnimatedTransitioning) -> UIViewControllerInteractiveTransitioning? {
return percentTranstion
}
}
定义类
MagicPresentTransition遵循协议UIViewControllerAnimatedTransitioning,并实现动画控制器的协议方法1
2
3
4
5
6
7
8
9
10
11
12
13
14
15
16
17
18
19
20
21
22
23
24
25
26
27
28
29
30
31
32
33
34
35
36
37
38
39
40
41
42
43
44
45
46
47
48
49
50
51
52
53
54
55
56
57
58
59class MagicPresentTransition: NSObject, UIViewControllerAnimatedTransitioning {
var ISPresent = true
func transitionDuration(using transitionContext: UIViewControllerContextTransitioning?) -> TimeInterval {
return 0.5
}
func animateTransition(using transitionContext: UIViewControllerContextTransitioning) {
var fromVC: UIViewController
var toVC: UIViewController
let container = transitionContext.containerView
let backView = UIView(frame: container.frame)
backView.backgroundColor = .black
backView.alpha = 0.35
if ISPresent {
let fromVVC = transitionContext.viewController(forKey: .from) as! UINavigationController
fromVC = fromVVC.topViewController as! AViewController
toVC = transitionContext.viewController(forKey: .to) as! BViewController
let fromView = fromVC.view
let toView = toVC.view
toView?.frame = CGRect(x: 0, y: UIScreen.main.bounds.size.height, width: UIScreen.main.bounds.size.width, height: UIScreen.main.bounds.size.height)
container.addSubview(fromView!)
container.addSubview(backView)
container.addSubview(toView!)
UIView.animate(withDuration: self.transitionDuration(using: transitionContext), animations: {
toView?.frame = CGRect(x: 0, y: UIScreen.main.bounds.size.height/3, width: UIScreen.main.bounds.size.width, height: UIScreen.main.bounds.size.height/3 * 2)
}) { (result) in
transitionContext.completeTransition(!transitionContext.transitionWasCancelled)
}
} else {
fromVC = transitionContext.viewController(forKey: .from) as! BViewController
toVC = (transitionContext.viewController(forKey: .to) as! UINavigationController).topViewController as! AViewController
let fromView = fromVC.view
let toView = toVC.view
fromView?.frame = CGRect(x: 0, y: UIScreen.main.bounds.size.height/3, width: UIScreen.main.bounds.size.width, height: UIScreen.main.bounds.size.height/3*2)
container.addSubview(toView!)
container.addSubview(backView)
container.addSubview(fromView!)
UIView.animate(withDuration: self.transitionDuration(using: transitionContext), animations: {
fromView?.frame = CGRect(x: 0, y: UIScreen.main.bounds.size.height, width: UIScreen.main.bounds.size.width, height: 0)
}) { (result) in
if !transitionContext.transitionWasCancelled {
backView.removeFromSuperview()
}
transitionContext.completeTransition(!transitionContext.transitionWasCancelled)
}
}
}
func reloadWithPresent(isPresent: Bool) -> MagicPresentTransition {
ISPresent = isPresent
return self
}
}值的注意的是,如果是带UINavigationController,需要通过nav.topViewController获取nav当前的控制器,如果是带UITabBarController,需要通过tab.selectedViewController获取tab当前的控制器。
定义遵循
UIViewControllerInteractiveTransitioning交互控制器协议的类,同时创建拖动手势,并根据拖动百分比,交互式的刷新动画,完成或者取消操作。1
2
3
4
5
6
7
8
9
10
11
12
13
14
15
16
17
18
19
20
21
22
23
24
25
26
27var percentTranstion: UIPercentDrivenInteractiveTransition?
let pan = UIPanGestureRecognizer(target: self, action: #selector(panWithDown(tap:)))
self.view.addGestureRecognizer(pan)
func panWithDown(tap: UIPanGestureRecognizer) {
let distance = tap.translation(in: self.view).y / 300
if tap.state == .began {
print("开始滑动")
self.percentTranstion = UIPercentDrivenInteractiveTransition()
//触发交互式动画
self.dismiss(animated: true, completion: nil)
} else if tap.state == .changed {
self.percentTranstion?.update(distance)
print("状态改变中")
} else if tap.state == .ended || tap.state == .cancelled {
if distance > 0.5 {
self.percentTranstion?.finish()
print("结束了")
} else {
self.percentTranstion?.cancel()
print("取消了")
}
self.percentTranstion = nil
}
}
3.拓展:圆形动画
效果图如下:
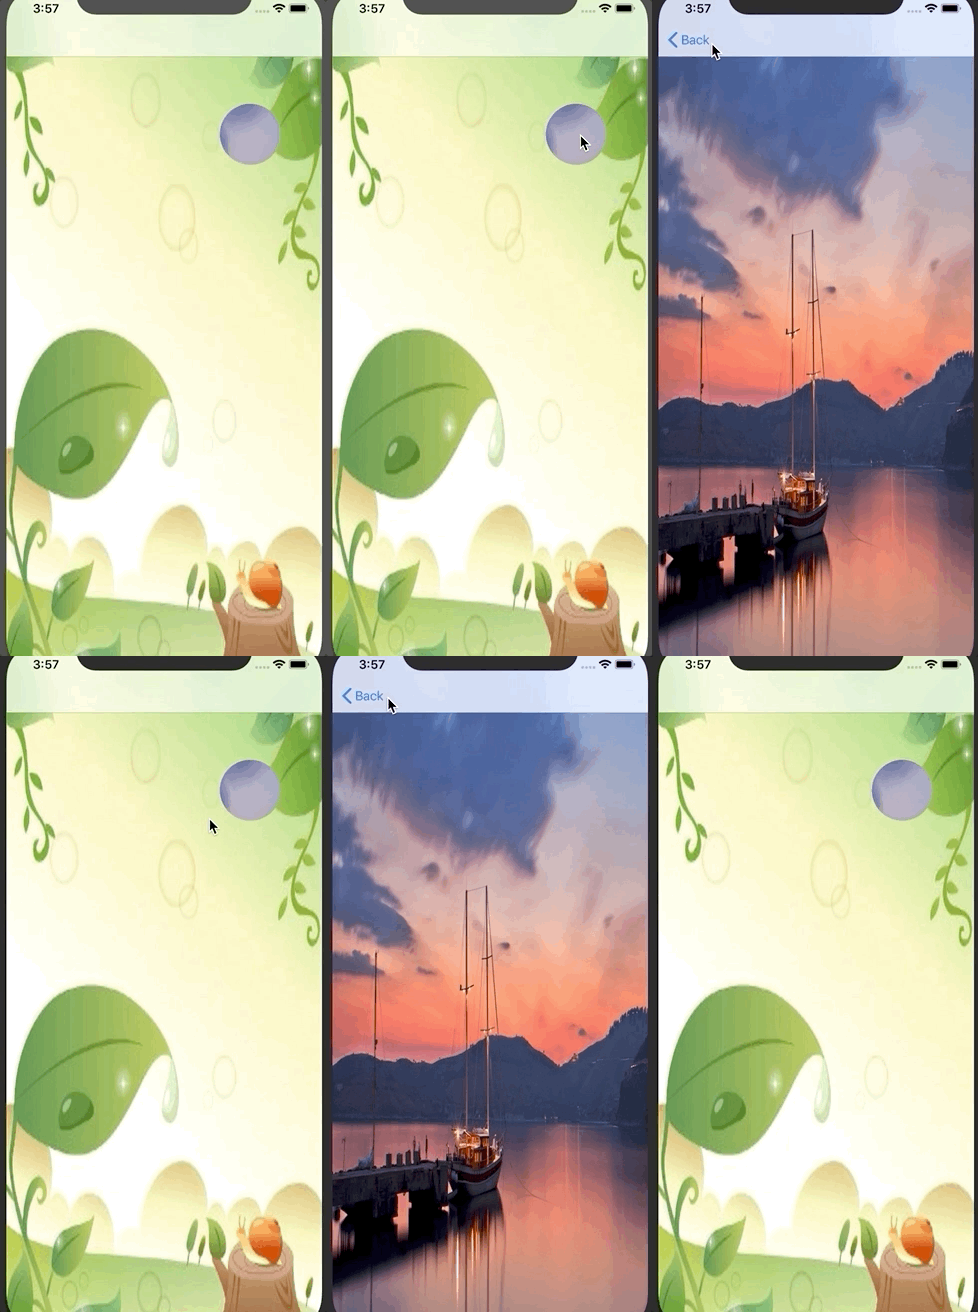
思路如下:
- 通过
mask遮罩配合CAShapeLayer类,实现蒙版效果 - 使用关键帧动画
CABasicAnimation进行缩放
关键代码如下:
1 | func animateTransition(using transitionContext: UIViewControllerContextTransitioning) { |
点击下载Demo
参考文献:
UIPercentDrivenInteractiveTransition使用


